


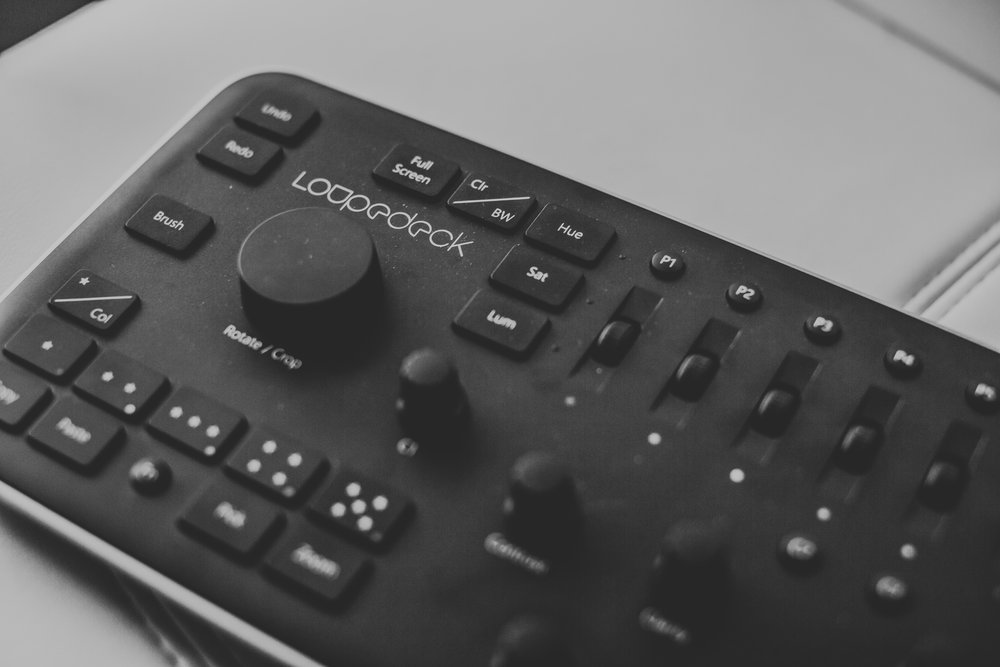
The Loupedeck Lightroom controller is simple to setup, and easy to implement into your photo editing workflow.
In our Loupedeck review, we discussed in depth the value it provides to us, and how it is able to help us decrease the amount of time we spend editing photos. As professional photographers doing a large number of shoots throughout the year, being able to save time in the editing stage is a huge deal!
What we are going to look at today is our simple guide to putting the Loupedeck to good use.
We will explain how we have implemented it into our workflow, how it has specifically made an impact for us, and some limitations that you may want to keep in mind before purchasing.
If you have not bought a Loupedeck yet, consider purchasing through our Amazon referral links. Every purchase provides a small commission to H&A, allowing us to continue producing quality content like this in the future.
How to Use the Loupedeck Lightroom Keyboard & Speed Up Your Photo Editing Workflow
Editing photos in Lightroom has never been easier!
If you have a newly unpacked Loupedeck, or are considering buying one, one thing is probably certain – you are hoping this device will be able to be a powerful tool to speed up your photo editing, and make editing photos more interesting, interactive, and even fun.
While editing with mouse and keyboard works just fine, as photographers wading through thousands of images each year, it can become quite a challenge as sitting in front of a computer can be mentally taxing, and while we might sound like people who need to get out of the house, also a bit painful in the hand and wrist after extended editing sessions.
In order to utilize the Loupedeck to its full potential, you should be familiar with Adobe Lightroom already – have a solid understanding of many of the basic editing functions like what toggling the exposure, contrast, clarity, blacks, whites, etc. does to the image you are editing. This will help streamline your learning curve, essentially only requiring you to locate where these buttons are on the controller.
In addition to this, it is also important to discover the parts of your workflow that the Loupedeck may not be able to fill in. With a number of assignable buttons, most sliders and functions will be covered. For us, one key area that requires us to jump back over to our mouse is when we have to resize/crop images. There is a rotate/crop knob on the Loupedeck, however it is only really good for straightening an image.
With this limitation aside, our basic approach to editing a wedding or session looks like this:
- We do an initial image cull outside of Lightroom
- We then import images into a Lightroom catalog
- We quickly run through and 5 star images in Lightroom we like the most using the built in rating and arrow keys on Loupedeck
- We then set Lightroom to only display rated images
- Now we begin editing images, this starts with applying a preset, which can be customized on the Loupedeck
- Once the presets are applied, we toggle the knobs and buttons, making adjustments as we see necessary to all elements such as the white balance, exposure, blacks/whites, various color hues/saturation/luminence, etc.
- On many occasions, we use the before/after button to compare our edit to the original image. This is especially useful in our workflow as we like our edits to at depth and drama to images, but still reflect the colors accurately. Making adjustments based on this comparison is essential to balancing color in the edited image.
- All editing functions are predominately done on the Loupedeck itself. It is intuitive and easy to use once you get used to it.
- For most weddings and session, our first edit session involves laying down a “base edit.” The ones we are most happy with, we will export quickly to put up on Facebook and Instagram as a sneak peak for our clients!! This can be done from the simple Export button on the Loupedeck.
- Throughout the next couple of weeks as we continue to refine our edits, we return to the same basic editing process loop.
- Once editing is complete, we just jump into Lightroom with our mouse and export all images together, then upload to our clients online gallery in Pixieset.
Loupedeck compliments the editing process, makes it faster, but doesn’t reinvent it
One thing that sticks out when thinking about our editing process today vs. what it once was is simple: it is fundamentally the same. The Loupedeck is just a tool that helps make this process quicker and a little more fun (as far as we are concerned). It has been easy for us to adjust to using the Loupedeck because of how complimentary it is to this process. Once you get past the learning curve, implementing it into your own photo editing workflow will feel like second nature.
For more information about the Loupedeck, check out our detailed review here.
If you would like to learn more about the Loupedeck or purchase, please consider using our Amazon referral links (found throughout this post) as we receive a small commission from each purchase (at no cost to you), which we utilize to grow our business and take our photography to the next level. This review is not sponsored or paid for. Hand and Arrow Photography Co. only supports products we actually use and benefit from – the Loupedeck being one of them!!


