


When it comes to taking portraits, photographers are not usually rushing out into the streets during night time. Given that the quality of photography is dependent on light available, or one’s ability to create light through artificial means, many photographers, as a result, aim to air on the side of caution when it comes to shooting portraits.
To be fair, this is a logical approach, especially for photographers who are working professionals. When we’re being paid to shoot portraits (or anything else), and we have the ability to control things like the lighting by opting to shoot during Golden Hour, we do. Natural light photography has it’s appeal for this reason – it allows us to worry less about getting the right light, and allows us to focus more on other important elements of photography such as composition and, with couples especially, helping people to elicit emotion that can be captured in our images.
As you might of guessed, shooting in low light is not always easy to do, but sometimes you may be looking for a certain effect or just in a dark environment that requires you pull on your photography knowledge to land the best shot. We are now going to chat a little bit about some of the ways you can take the best quality images in low light shooting environments.
find the good light
While low light conditions come in many forms, ranging from virtually no light (like a pitch black room) to an ambient lit reception hall, the first thing to do is evaluate your environment. If there are any areas at all giving off good light to work with, moving your portrait subject into this light can help your portrait session immensely. We find this often with barn wedding venues, where many spaces are dimly lit, yet there may be ample usable light right next to a window or door. A quick movement of the shoot to this area, and in a matter of a few test shots, we can be on our way to taking great quality portrait photos.
It seems silly to point out, but just being able to identify these locations and have a person move to a new area can feel daunting for some photographers. This is especially true for those who are more introverted and quieter. Taking control of your session helps you to get the best shots you need for the person you are photographing.
While finding good light in otherwise poorly lit environments can be great, and allow you to basically use similar settings on your camera as you would when shooting outdoors in natural lighting, we do know that not all environments have good lighting to resort to. This is where we find we look to more technical knowledge, better quality gear, and so on to get the right shot.
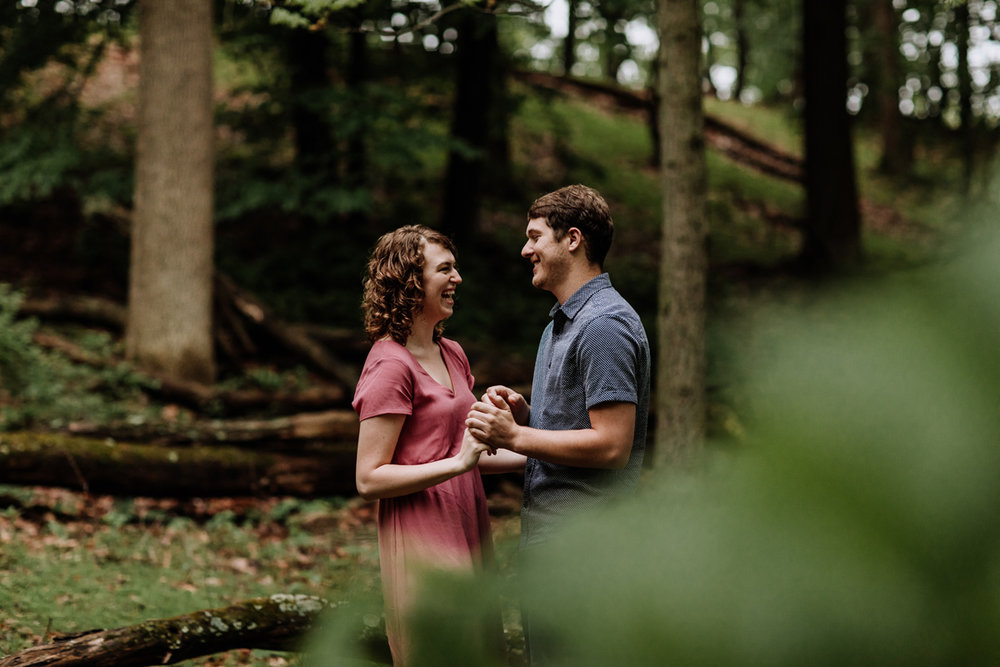
This image was taken on a Canon 5D Mark IV with ISO bumped to 1200. While it was cloudy and generally a “good light” day, in this wooded area there was a lot of shade that made the images much darker than normal, and requires us to compensate on our camera to capture the image. This in camera change paired with good post processing in Lightroom results in a lovely shot that retains some of the moodiness you would expect from shooting in a darker location, but doesn’t detract from the rest of the images from the evening.
increase your iso
Regardless of the camera you are using, increasing your ISO will allow you to manipulate the image to output more light in the scene. The resulting image will see an increase in artificial grain being added to the image, and certain camera bodies handle this better than others. Consumer level camera bodies, such as the Canon Rebel, will not handle an increase in ISO nearly as well a professional camera body such as the Canon 5D Mark III and Canon 5D Mark IV. This is one of the significant reasons (among many others) that people are willing to invest thousands of dollars into a camera. Most cameras perform well in ideal lighting scenarios, however pro cameras have the ability to be adapted to handle the stress and strain of those environments that are less than ideal.
As we use the aforementioned Canon 5D Mark III and Mark IV ourselves, we have found that we can take portraits in low light with ISO’s bumped up as far as the area of 1500 ISO and still have images that are usable before artificial grain takes over and makes the photo look unappealing.
open your aperture
Since aperture changes control the amount of light that is let in/kept out of your camera sensor, when needing to get more light into your portrait scene, an easy way that will not negatively impact your image quality. While budget and consumer level camera lenses will not often stop down low enough to take full advantage of this (many of these lenses with starting f-stops around f/4), prime camera lenses can commonly be found to stop down as low as f/1.0. We primarily use Canon prime lenses ourselves, and highly suggest these for their quality and value, especially when being used in low light environments.
It should be noted, though, that as you open the camera’s aperture, you will be increasing the depth of field. When shooting at lower f-stops, there will be more separation between the subject and the background, often causing the blur effect you will see in some images. This works well for us and our general photography style, but may have difficulties if you are attempting to get a group portrait that may require a higher f-stop in order to get more people in focus.
If you are interested in a great lens with the ability to use a lower f-stop for your images, check out our review of the Canon 50mm f/1.2 lens.
decrease your shutter speed
Often when we are shooting, we aim to keep our shutter speed at a reasonable setting so as to counteract any camera shake or movement in the frame. With portrait photography, a vast majority of the time your subjects will not be moving, and as a result decreasing your shutter speed can be an easy way to add stops of light into your image. Still, when hand-holding a camera, we try not to go below a shutter speed of 200 in order to avoid camera shake.
If the option is available too you, pull out a tripod and remote control the images you are taking. With the Canon 5D Mark IV (and some other camera bodies by Canon), there is a great app available to do this using your phone – Canon Camera Connect. Dropping your shutter speed significantly lower is much easier using this, so long as you remind your subject(s) to stay still.
Related Article: The Exposure Triangle
make sure you get your subject in focus
This suggestion may sound a little dumb and obvious, but it is actually one of the biggest offenders in low light photography. The reason is because as it gets darker outside, or ambient light inside gives off too little useable light, your camera will begin to have trouble focusing because it cannot “see” the subject. One simple way to remedy this is to pull out your phone’s flashlight to illuminate your subject to grab focus, then turn off and take your photo.
One reason getting focus right is particularly important in low light photography is because there will often be a natural softness to these images, particularly when you have introduced a lot of grain through increasing your ISO. Missed focus images in broad daylight may still be usable in certain instances, but in poorly lit environments, the images become far more difficult to use if they are soft from a lack of proper focus, and softened by artificial grain.
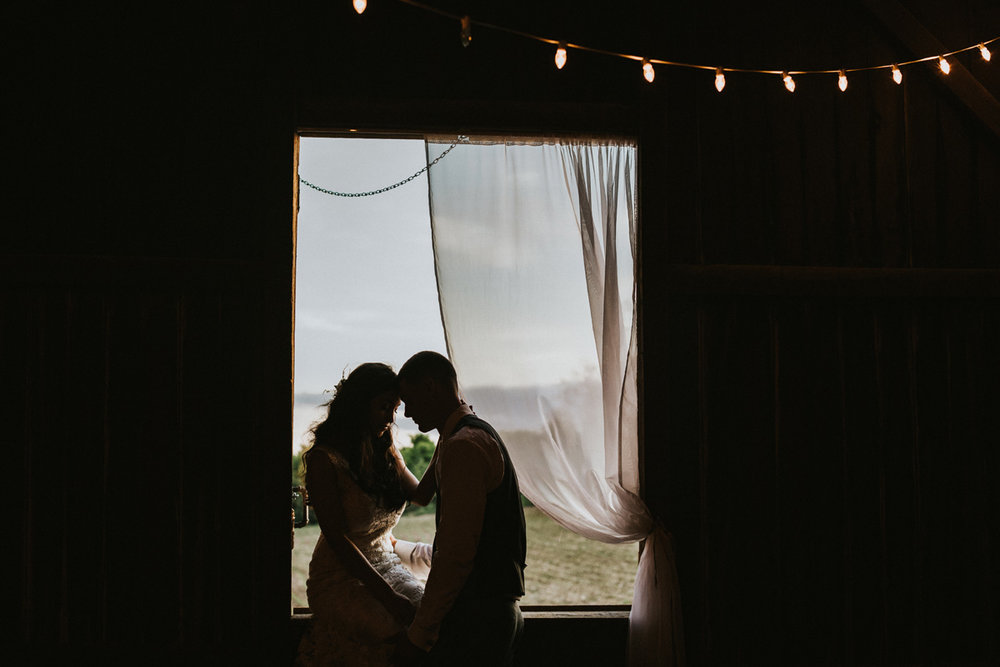
One type of lighting environment that can be challenging are those that combine a mixture of low light (ie: inside a barn) and streaking light. This is exemplified in this photo, where there are good sources of light, but the quantity of light that reaches the subject of our photos is not enough to work with. To get a good shot in this environment, we incorporated on camera flash (using the Profoto A1) to illuminate the subject, eliminate unwanted shadows on her face in particular, and smooth out the appearance of other light sources coming from the background by using a wide aperture.
add flash (or two)
While low light photography can be managed through taking advantage of your built in camera bodies functionality, adding flash to your shots can be an easy way to create better images with ease. Flash photography, at least on a basic level, is quite easy. This is especially true with more modern flashes that have integrated automatic flash compensation modes (TTL).
Early on into shooting weddings and portraits in other settings, we stuck closely to on camera flash as a way to get better quality images. Good starter flashes that have a good quality-to-affordability are Yongnuo Speedlites and the Canon Speedlite 600-EX II RT – both of which we initially used as a part of our flash setup. We have since upgraded to a higher quality flash setup consisting of on camera flashes (Profoto A1’s) and off camera flashes (Profoto B1X’s). While the differences are significant enough to us to warrant the pretty significant price difference, any of these flash options will be suitable to helping you achieve the goal of better portraits in low light.
Review: Profoto A1 – Is It Worth the Hype?
add static light
As we sort of alluded to when talking about focusing in low light environments, adding a source of light to get focus as a great way to get the photos you want. While for some people, an iPhone light will be sufficient, as a professional photographer this doesn’t exactly come across as “professional looking” (if that matters to you). Plus, the power on the light may not be significant enough in certain environments. A common solution is to use video lights or Mcoplus Magic Tube Light.
The benefit of this sort of light is that you can produce directional lighting in your low light shots, which is perfect for creating portraiture with more depth and feeling. These can also be less intimidating than learning flash photography – and while we don’t suggest disregarding flash entirely, it is an option if you don’t feel tech savvy enough to figure out flash.
develop low light editing techniques
In the context of modern digital photography, it is extremely common to for post processing editing to applied to the images you take. We commonly use Lightroom and Photoshop to edit our images, and in the case of low light images it is especially useful to be able to adjust the exposure as needed to add more light. Additionally, one of the challenges and general consideration with low light photography is also being sure to get the colors of your edit correct to positively impact the mood of the image. With low light portraits, it is especially important to keep in mind that, in many scenarios, you will likely be wanting moodier images. For weddings, low light functions to add a romantic mood to our images.
conclusion
There are a lot of different ways you can impact your photos in low light in order to capture the best possible images. Within your camera itself, you have the ability to influence the shutter speed, ISO, and aperture to enable more light in your pictures. In addition, external flashes and static light sources can be used to add light artificially to a scene.
We hope you find some of these techniques for tweaking the light in your low light images to be useful!!


